INTRODUCTION
Hey guys! Today I will be talking about how we can decrease our GPU temperatures with little to no effort. This is the easiest way to decrease your temperatures. This will work in Laptops and PCs as well. This method is called “Undervolting.” When your GPU is being made, the creators will drop a certain voltage to your GPU to be stable and works fine. But, an unnecessary amount of voltage is always present in a CPU or GPU. So, if we decrease/remove the unnecessary voltage present, We can expect huge temperature drops while using the machine. To do this, We will be using a program called MSI Afterburner. Let’s get started!
Note: This is a risky process. If you don’t follow the instructions with care, Your computer might not function properly or not function at all. Sassygamers is not responsible for any damage caused to your computer machine.
INSTALLING MSI AFTERBURNER
First off, You have to download the GPU undervolting/monitoring tool called MSI Afterburner from this link https://www.msi.com/Landing/afterburner/graphics-cards, click on the download button, and it should be downloaded to your Downloads folder.
Now go to the folder where Afterburner is downloaded, and run the installer/setup. Now you have to follow through with the prompts. Once you reach the stage where it asks you if you want to install RivaStatistics Tuner, Make sure the box is checked, RivaStatistics Tuner is used to monitor our temperatures, frames per second, and many others while playing games or running productive programs. It will show all of the details on our Right Top.

INSTALLING SUPERPOSITION BENCHMARK
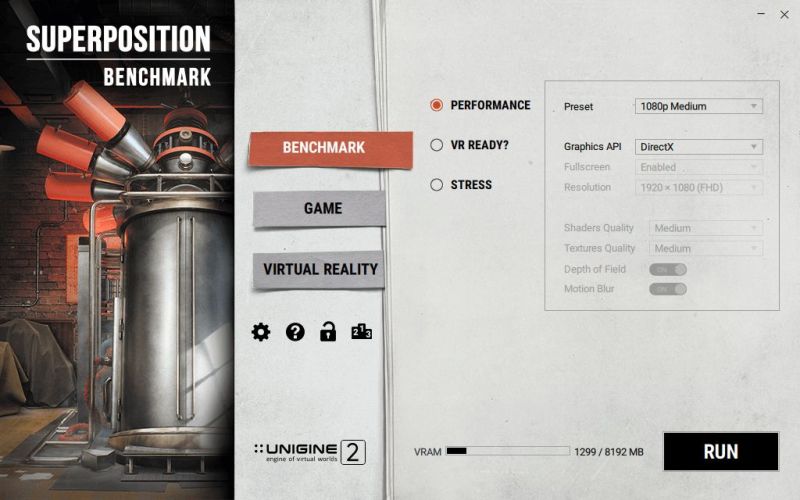
Now, for testing and monitoring your temperatures, we need a tool that can put pressure on our GPU to know if it is stable or not with the removed voltages. Thankfully, we have the right tool for that! Superposition Benchmark. Super Position Benchmark will put 100 percent load on our GPU to test if our GPU is stable at the given voltage or not.
Lets download Superposition! Click on this link and download it : https://benchmark.unigine.com/superposition
Once downloaded, you have to follow the same steps as MSI Afterburner, go to the folder where the Super Position benchmark is downloaded, and run the installer/setup. Now you have to follow through with the prompts.
USING AFTERBURNERS GRAPHICAL INTERFACE
Below is an image of how Afterburner should look after you installed it. Please do not play around with any options like Core Clock and Memory Clock. If you mess something up, It can be really dangerous. The four labels in the center of the application are very much self-explanatory. The first one shows your GPU Clock, Do not worry if this option fluctuates between 0 – 500MHz. This is completely safe, and you have no reason to worry. The second label is your Memory Clock of the GPU, the same as the above. You don’t need to worry if this option is fluctuating between 0 – 500MHz. The third option is voltage. Last but not least, Is the temperature of your GPU. Now we won’t be getting out of topic and learn how to enable RivaStatistics Tuner. I suggest you read and follow the steps from this guide before you proceed with this guide, https://linustechtips.com/topic/977649-guide-how-to-setup-msi-afterburner-on-screen-display-using-rtss/
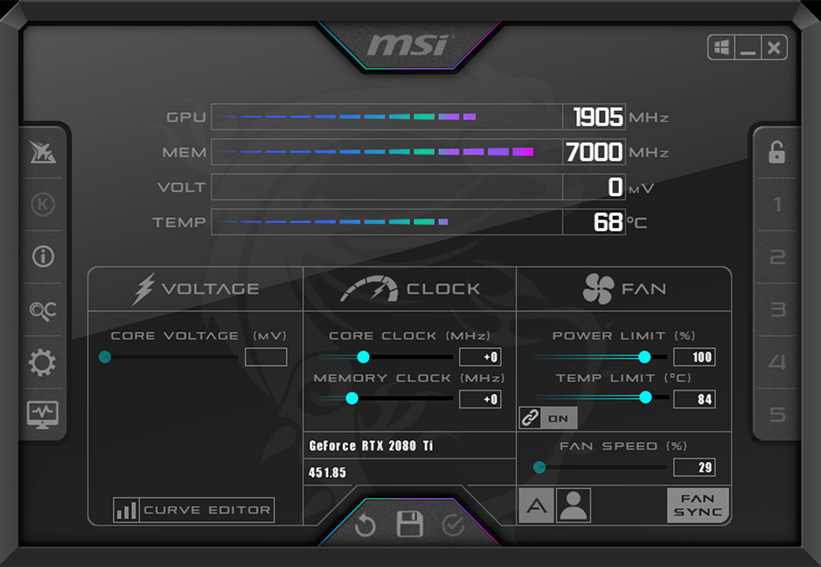
You will see 3 tabs, Voltage, Clock, and Fan. Normally, Voltage and Fan are locked. So we will not get too advanced in this, and we will just be using the curve editor of the voltage and the Core Clock. First, you have to run Super Position Benchmark on Extreme Settings. Keep looking at the temperatures and fps, and mark them up like this. If your temperatures cross 90+, Immediately turn off the benchmark and note down as Temperatures 90+

Keep noticing your core clock and note it down in the notepad as well. Note down your Max Core Clock and Minimum Core clock. Take a number between them that you have seen appearing at least more than thrice. Example: Your GPU Core Clock is flickering between 1655 – 1855. You will choose something like 1755, Be sure to run the whole benchmark if your temperature does not cross 90+ on CPU or GPU, If it does, make sure to stop the benchmark immediately.
After storing your details in a notepad and following the above steps, You are now ready to start Undervolting your GPU in MSI Afterburner. First, you can close the Benchmark Result screen. Then, open MSI Afterburner, And go to the settings tab. And enable “Unlock Voltage Control” and “Unlock Voltage Monitoring.” These options will enable control overvoltages in your GPU.

Now you need to restart MSI Afterburner. After done, click on the curve editor. And now you should see the graph of a curve including the values of your GPU Core Clock and Voltages. It should look something like this.

Undervolting is a time taking process. You need to underclock your GPU and then bring up the clock on the certain voltage you want to apply. Let’s start from voltage 975. This is a safe and sweet spot to start from. First off, Click on your core clock in Afterburner, And type “-250,” and hit [ENTER].

After doing -250 on the core clock, your core clock will go down to -250 clocks. Now you have to find the square of 975 voltage on your Curve. You can use the lines shown on the graph.

This is how you know the 975 Voltage is selected. The 975 should be covered with white background. Now increase the square with your mouse or Arrow Keys to the point it reaches the clock you noted in your Notepad (The clock is shown on the left side of the curve editor). For me, it is 1750. So I will increase the square to 1750 Clock. Your curve editor should look something like this now.

Now go to Afterburner, and click on the apply icon (a tick), Now all of the curves should be edited in a straight line from the voltage 975 on clock 1750 (1750 for me, for you, the one you note in your notepad).
Now minimize Afterburner. And run Super Position Benchmark once again with the Extreme Settings. Run the whole benchmark if your GPU temperature does not go above 90+. Note down the details as the same but without the core clock because we will be using the same core clock throughout the undervolting process.
Now you have successfully undervolted your GPU -25 Volts, but you must keep doing this until your PC does not crash on the benchmark. After that, the process will be the same.
- Reset Settings of Afterburner
- -250 on the core clock.
- -25 Voltage to whatever your PC ran on earlier (If you follow this guide, then you must go 950, with the same process. Then 925, 900, 875..)
- Run Benchmark after making changes so that you know your GPU is stable.
- If you crash during your Benchmark, you should
- Make sure you reset your settings before every change on the voltages.
You might want to watch this guide as well if you are confused: https://www.youtube.com/watch?v=I9K4PSqxoYg&t=697s
Thank you for reading!