Hello everyone! Today I’m going to be breaking down the myths behind muscle memory. From there giving you guys all of the information you need to use AimLab, a completely free to play aim trainer designed to help you improve at aiming, easily downloadable on Steam to help you improve in Valorant, and for those who want to know exactly what they should be doing, we’re going to close out the video with my aim lab playlist, as well like all of the best settings, and anything else you might need to work on for you to follow.

Two things to understand when it comes to being a good aimer because it is literally the foundation that your ability as a gamer is built upon. They are both commonly referred to as muscle memory. There’s muscle fiber memory and Neuron memory.
Muscle Fiber memory is your muscle’s ability to get back to its full ability after degrading over time, whether it’s reaction time or simply the size of the muscle. And it’s much easier to relearn a skill and get back to your peak than to reach that peak in the first place.

And then there’s Neuron Memory, which is what we’re going to be focusing on because aim training is mostly developing the brain, it’s like riding a bike; there seems to be this moment where it just clicks, and you’re able to perform the task, and it never really goes away. But you can improve on that ability because the connections in the motor cortex of your brain can be improved upon, developing stronger connections, and allowing your brain to access that memory easier, making you faster to perform the movement, and much more consistent as well. And, these motor neurons that we’re developing will be able to help out with other similar actions, which is why I’ve developed a well-rounded aim training routine to help fully develop your aiming ability.

Now, Let’s talk about the aiming mechanics that are most common in valorant that we’re going to be developing and exactly how we’re going to do it. At this point, we’ve all probably heard that crosshair placement is the most important thing in Valorant, which means that the most common movement that you’re going to be performing is micro-changes around your crosshair, otherwise known as micro-adjustments. In valorant, most of your kills are going to come from an enemy peeking around a corner, or you peeking a corner, and an enemy being just slightly off of your crosshair. The micro-adjustment is the key to snagging that kill, and the perfect task to develop your ability to micro-adjust is called micro shot.

There will be one ball on the screen at all times, and as soon as you destroy the ball, another one appears very close to the other target. The goal is to be as accurate as possible with this task while going as fast as possible. a great goal for this task is to be as fast as you possibly can go while staying above 90% accuracy.
After that, of course, we have horizontal movement, for when enemies are strafing left to right or right to left, and you have to land that first shot to give them the 70% slow from the bullet to be able to pick up the kill. For this skill, we’re going to be incorporating the motion shot task.

Here you’re going to have one target spawn in the very center of the screen, and as soon as you shoot the target, another ball of varying sizes will appear and move across the screen. The goal again is to flick as fast as possible to the target and land an accurate shot. this is perfect for developing the ability to land those headshots on moving targets, which is a bit more difficult. Still, you’re going to want to stay above the 80-85% accuracy threshold and increase your speed as much as possible while still maintaining accuracy.
And next, we have target switching, the highlight play skill where you have to swap from one target to the next accurately and quickly pick up two or more kills very quickly. To train this skill, we’re going to be training using the switch track ultimate task.

For this task, balls will be filling up the screen, moving horizontally in both directions. The goal is to flick to each ball as fast as possible and maintain your crosshair on the target until the target is destroyed. since your gun is always firing for this task, accuracy is purely dependant on how much time you spend with your crosshair over a target, so instead of focusing on accuracy, focus on swapping targets as fast as possible and not letting your crosshair come off of the target the entire time. This is one of those skills that takes a while to implement into the game, but once it clicks, just like riding a bike, you’ll notice a HUGE improvement in your play, and you’ll start picking up those big rounds for your team.
And finally, let’s talk about reaction time. In a game where fractions of a second are the difference between killing or being killed, winning or losing a round, or winning or losing a game, your reaction time can be one of your biggest strengths or your worst weaknesses.
Reaction time is a highly debated topic on what the most effective ways to go about it are, but it’s agreed upon by most that you can improve your base reaction time by somewhere from 10-20%, and we know that performing the task that you want to get faster at works. So for this task, we’re going to be doing the detection ultimate task.

Here we’re throwing aiming, moving, and everything else out of the window to isolate the reaction time aspect of the task. Relax, look at the screen, and click your mouse as fast as possible as soon as the target appears on the screen. The goal of this is to train your brain to react to the stimulus as quickly as possible. And this shouldn’t be one of those tasks that you expect to see incredible results from overnight, but over time this could easily be the most beneficial exercise of them all.
And finally, we have an honorable mention to finish it off.
In Valorant, sound localization is a huge part of the game, where you hear a noise in your headphones, you’re predicting what you’re hearing and where it’s coming from. Which are usually footsteps behind you because your cipher forgot to put down his tripwires, and while this should come with time for most people, I notice a lot of people have trouble with being able to localize sound properly. Aimlab has a great exercise to help you with this.
The task is called Audiospatial 8, where 8 orbs will spawn around you and randomly make a noise. The goal is to flick to the target that the sound came from and shoot that target. For those that have trouble turning on people who catch you off guard, doing this task for about 10 minutes a day for a week will do wonders for you.
Now we have left out quite a few different types of aiming here because Valorant doesn’t require that type of movement, things like long-range flicks past about a 60-degree field of view. Very rarely will you have to make those long-range flicks because Valorant has very funnel-like places on the map, and you can generally tell where the enemies are going to be coming from, so the long-range flick practice is a bit inefficient? We also have vertical movement, where other games have an insane amount of vertical movement. Valorant has very slight verticality built into the maps. Most of your fight will be on the same level or very slightly above, but very rarely a target moving upwards. And then we have tracking with constant left and right changes in movement, where other games have insane movement while shooting. Once enemies are tagged once in valorant, they’re essentially a sitting duck while you finish them off.
BUT, before we send you on your way, you HAVE to make sure that you have your settings right, I see so many people that tell me that valorant feels different from aim lab, and we go through their settings, and they’ve been practicing with the wrong field of view or the wrong sensitivity.
Ok, so first of all, from the home screen, go to the settings cog in the bottom right of the screen. In the graphics, section make sure that you have “fullscreen exclusive” enabled so your game can properly run at whatever Hz you have your monitor set to. Otherwise, it will default to 60. Your max queued frames should be set to low latency if your computer can handle it for the lowest amount of input lag. Then turn your graphics on fastest and everything below that off so you can get the most frames possible, and make sure your frame rate limiter is set off.

Then you’re going to navigate to the controls tab on the left and select the valorant game mode. Here your sensitivity should match your in-game sensitivity, and make sure the field of view is set to 103, which is Valorant’s field of view setting. And finally, navigate to the game tab on the left, scroll to the bottom, set it to the first-person mode, and hide the weapon view model.


This way, you’re getting rid of anything distracting on the screen, and you can focus on the mouse movements of the targets. Also, it’s worth mentioning that a typical valorant crosshair is somewhere around 1 length 2.5 thickness, and 1 crosshair gap, but that’s personal preference,

And before going into a task, make sure your map is set to a grey box so it gets rid of all of the distracting things on the screen so you can once again focus on the task at hand.

Now let’s get into my playlist. This playlist is designed to be a warmup and done whenever you’re done with valorant for the day. It’s super easy to download and use, so optimally, you’re going to use this playlist 2 times a day, in the morning before you play and before you’re getting off for the night. It’s also a very short 18-minute playlist, so if you’re ever in a slump, take a break to do the playlist to warm back up because warming up is completely overpowered, and just doing a simple warmup will put you way ahead of most of the people at your skill level,
So first off, we’re going to start with 3 grid spot tasks. Grid shot is a staple in any routine and is what you’ll see pro players like tense grinding on stream, simply because it’s great for getting the hand warmed up, getting you moving the mouse correctly, and just because it’s an enjoyable task to do. And fun is a huge part of sticking to a routine. For grid shot, you’re going to want to go as fast as possible while maintaining a 90% accuracy on your shots, so be sure to speed up as much as you can, but we want to make sure we have good form and maintaining a high level of accuracy because it doesn’t matter how fast you are if you can’t hit your shots.

Of course, next, we have 4 runs of motion shot. This task gets even more difficult and starts to incorporate movement into the task. Here you want to focus on clicking the stationary target and getting to the moving target as quickly as possible. This will help develop your ability to hit targets on the go and snag those headshots on difficult-to-hit targets. This task is a bit more difficult, though, so you’re going to want to focus on the 80-85% accuracy threshold while pushing yourself to go as fast as possible while maintaining that.

Then we’re going straight into 4 runs of the micro shot task. Like grid shot, this task is great for warming up, but it forces you to be more precise with your movements. It is going to train your ability to micro-adjust to targets close to your crosshair. for this task, you want to aim for a 92% accuracy threshold while once again pushing yourself to go as fast as possible, so speed up your shots until you start to fall below that 92% mark.

Then we’re going to pivot into switch track. This task will train your ability to map out your path from target to target and start racking up those kills back to back and picking up those rounds you have no business winning. For this task, you want to focus on speed, going as fast as possible, snapping from target to target as each of them is destroyed, and focusing on not letting your crosshair escape the target once you lock onto it.

And finally, we’re ending off the playlist with 3 runs of the detection task where you’re going to be developing your reaction time and improving your skill in Valorant all across the board. For this task, you can forget about accuracy or movement and erase your mind of everything and focus on clicking the mouse as humanly fast as you can as soon as the target appears on the screen.

Now I do have a couple of closing remarks because Aimlabs isn’t going to do everything for you to improve in Valorant. Crosshair placement is one of the most important factors in valorant. Aimlab can’t help you very much with crosshair placement because it’s mostly dependent on map knowledge and understanding the headshot height of the angles you’re going to be peeking into or being peeked from. If you do want to train crosshair placement, then deathmatch is going to be your best friend.

So instead of focusing on winning the deathmatch, visualize the angles that you’re going to be peeking into, and try to predict the headshot angle with your crosshair. Another great tip is to line your crosshair up with your teammate’s heads at the beginning of each round and try to keep your crosshair at that level throughout the entire round. This way, any enemy peeking at your level will be perfectly in line with your crosshair, and you have to move your crosshair the shortest distance to hit that headshot.
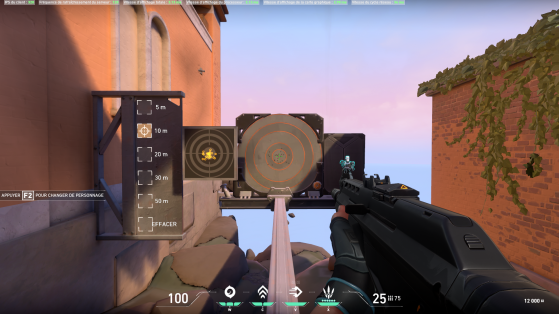
And, of course, we have sprayed. Spraying is individual for each gun in valorant, and Aim Lab can mimic that in-depth nature, so you’re going to need to practice those shots as well. The best way to practice this is to go into the shooting range and pick out your gun of choice. Go to the practice dummy with the adjustable target, set it to 20 meters, and focus on spraying as much as you can while keeping all of your bullets inside of the smallest circle in the middle. Gradually increase the number of bullets you’re spraying, and in no time, you’ll be able to follow up the precise first shot you’re training with some backup shots to finish the job.
And finally, Aimlabs isn’t the real game. You should always follow up with some deathmatch or games if you have the time after training in Aimlabs to help connect what you’ve practiced in isolation to the actual game of Valorant.
Recommended playlist – https://steamcommunity.com/sharedfiles/filedetails/?id=2339432541